The starter solenoid wiring diagram shows how electrical current flows between the battery, ignition switch, and starter motor. It helps identify each wire’s function and ensures correct placement for efficient starting. In a typical setup, the solenoid acts as a switch that sends power from the battery to the starter motor when the ignition key is turned. Studying the diagram helps prevent miswiring, which can cause starting issues. Understanding this layout is the first step in diagnosing or repairing starter problems.
The starter solenoid typically has two large wires—one from the battery and one to the starter motor—and smaller wires from the ignition switch or accessories. The small red wire connects to the “S” terminal to trigger the solenoid, while a thin black wire may act as a ground. Always follow a wiring diagram to ensure each wire is connected correctly for proper engine starting.
In this article, we discuss the topic of “diagram what wires go to the starter solenoid”.
What Is a Starter Solenoid and How Does It Work?
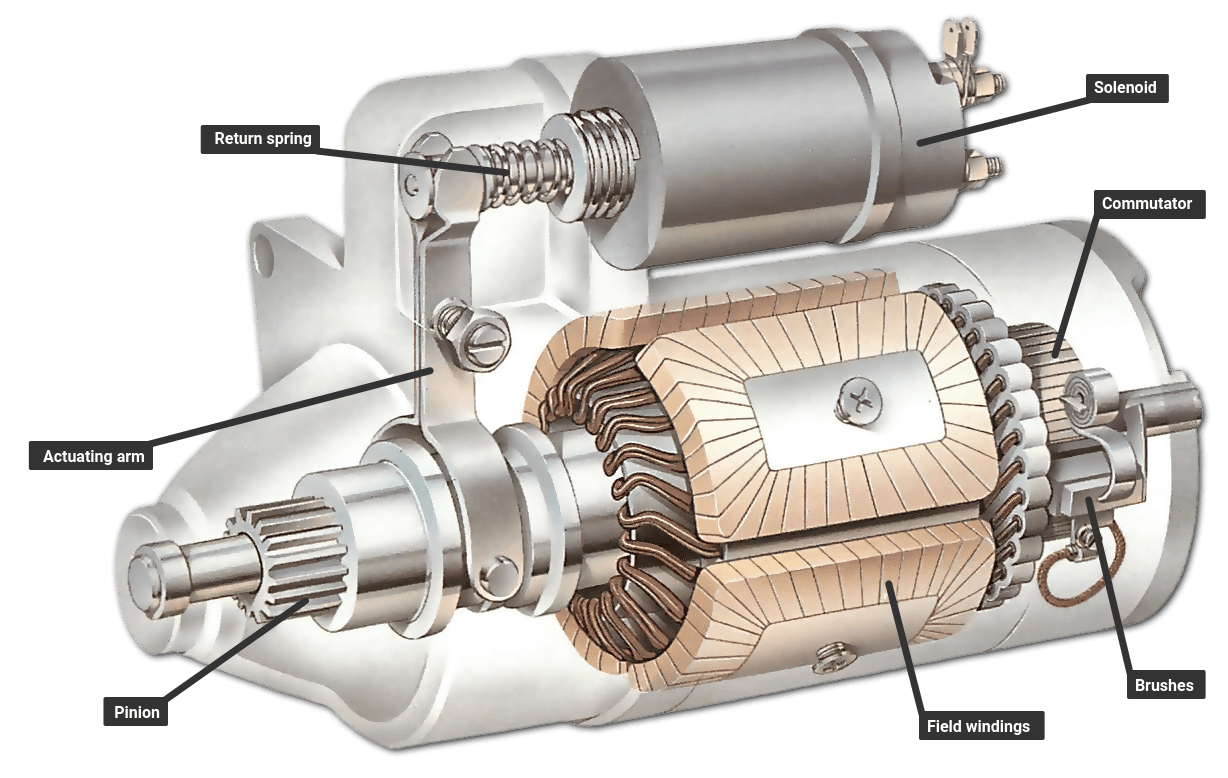
A starter solenoid is an electromagnetic switch mounted on or near the starter motor. When you turn the ignition key, it receives a signal from the ignition switch, creating a magnetic field that closes the circuit between the battery and the starter motor. This allows high current to flow and crank the engine. The solenoid not only delivers power but also pushes the starter gear forward to engage the flywheel. Without it, the starter system wouldn’t function properly.
Why Wiring Connections Matter for Proper Starting
Every wire on the starter solenoid has a specific role in delivering current and signals at the right moment. If one wire is loose, corroded, or incorrectly connected, the solenoid may fail to activate or the starter might not turn. Proper wiring ensures consistent voltage flow and prevents electrical arcing. Incorrect connections can lead to no-start conditions, battery drain, or even short circuits. Always double-check the wire layout before tightening connections.
Identifying the Five Wires on a Starter Solenoid
A common starter solenoid setup includes five key wires: two large eyelet cables for high current, one smaller red wire for ignition power, and possibly a thin black wire for ground or accessories. Each serves a unique purpose in transferring energy through the circuit. The large eyelet wires usually connect to the battery terminal and the starter motor. The smaller wires manage control signals from the ignition system. Knowing their roles ensures a reliable connection every time.
Step-by-Step Guide to Connecting Starter Solenoid Wires
To connect the solenoid wires correctly, first disconnect the battery to ensure safety. Then, attach the large battery cable to the main power terminal on the solenoid. Connect the other large wire to the starter motor terminal. The small red wire should go to the ignition switch terminal, often labeled “S.” If there’s a black ground wire, fasten it to a clean metal surface. Once everything is tight and secure, reconnect the battery and test the starter.
What Each Wire Does in the Starter Solenoid System
Each wire in the starter solenoid setup plays a crucial role in completing the electrical circuit. The battery wire delivers high current directly to the solenoid. The ignition wire sends a signal when you turn the key, activating the solenoid coil. The motor wire transfers the current to the starter motor itself. Ground wires ensure a stable electrical connection, preventing voltage drops. Understanding each wire’s job helps diagnose issues faster and prevents electrical damage.
The Function of Large Eyelet Wires on the Solenoid
The large eyelet wires are the main power carriers in the solenoid system. One connects to the positive battery terminal, while the other links to the starter motor input terminal. These thick cables handle heavy current flow during engine cranking. Since they carry high voltage, secure tightening and clean contact surfaces are essential. Corrosion or loose eyelets can cause voltage loss or slow cranking. Always inspect these terminals when troubleshooting starter problems.
Connecting the Battery Cable to the Solenoid
The battery cable is typically the thickest wire in the starter circuit and attaches to the large terminal on the solenoid. This terminal remains “hot” at all times, meaning it always carries battery voltage. When you turn the ignition key, the solenoid bridges the connection to the starter motor. Before tightening, ensure the cable eyelet and terminal are clean and free from rust. A poor battery connection can result in weak or no engine cranking.
Where to Attach the Starter Motor Wire
The starter motor wire connects to the solenoid’s output terminal, which activates when the solenoid engages. When current passes through, this wire delivers full battery voltage to the motor, turning the engine’s flywheel. If the connection is loose or corroded, the starter will spin weakly or not at all. Secure the eyelet firmly with a nut and washer, ensuring no exposed strands. Proper attachment guarantees efficient power transfer during startup.
The Purpose of the Small Red Wire on the Solenoid
The small red wire serves as the control signal wire from the ignition switch. When the key turns to the “start” position, voltage flows through this wire to energize the solenoid coil. It’s responsible for triggering the relay action inside the solenoid. Without this wire connected properly, the solenoid won’t activate, and the engine won’t crank. Always verify that the red wire is on the correct small terminal, typically labeled “S.”
Understanding the Thin Black Wire Function
The thin black wire in the starter solenoid circuit often acts as a ground or auxiliary signal wire. Its main job is to provide a path for current return, ensuring the solenoid completes its circuit correctly. If this wire breaks or disconnects, the solenoid might fail to engage even when other wires are properly connected. Always inspect it closely for damage or corrosion. Repairing or replacing it with a similar gauge wire restores proper solenoid function.
How to Reconnect a Broken Thin Black Wire Safely
If your thin black wire has broken, start by turning off the ignition and disconnecting the battery for safety. Strip a small section of insulation from both broken ends and twist them together tightly, then secure with solder or a crimp connector. Cover the connection with heat-shrink tubing or electrical tape to prevent exposure. Avoid using makeshift materials, as poor insulation can lead to short circuits. Once repaired, reconnect the wire to its original solenoid terminal.
Typical Starter Solenoid Terminal Layout Explained
A starter solenoid usually has two large terminals and one or two small terminals. The large ones handle heavy current — one connects to the battery and the other to the starter motor. The smaller terminals, often labeled “S” and “I,” are used for the ignition and accessory circuits. Knowing these labels helps you connect wires correctly. Most diagrams indicate these points clearly, so always refer to your vehicle’s wiring chart before installation.
Starter Solenoid Wiring Color Codes and Meanings
Wiring color codes can vary depending on vehicle make and model, but they generally follow a standard pattern. Red or yellow wires usually carry power from the ignition switch, while black represents ground. The large cable from the battery is often red, and the wire to the starter motor may be a thicker gauge brown or orange wire. Always confirm your vehicle’s color scheme using a wiring diagram to avoid mistakes during reassembly.
Diagram: Correct Wire Placement on a Starter Solenoid
A clear wiring diagram helps visualize where each wire connects on the solenoid. Typically, the battery cable connects to the large terminal marked “BAT,” and the starter motor wire attaches to the opposite large terminal. The small ignition wire connects to the “S” terminal, while any auxiliary or ground wire connects to the “I” or housing bolt. Following this diagram ensures current flows correctly through the system, allowing smooth engine cranking every time.
How to Identify Power and Ground Connections
Power wires deliver current from the battery or ignition switch, while ground wires return the current to complete the circuit. You can identify power wires by checking for 12 volts with a multimeter. Ground wires will show continuity to the vehicle chassis. It’s important to separate these properly to avoid accidental shorts. Always attach ground wires securely to a clean metal surface to ensure solid conductivity and prevent electrical resistance.
The Difference Between S and I Terminals on a Solenoid
The “S” and “I” terminals serve distinct purposes on a starter solenoid. The “S” terminal (Start) receives the signal from the ignition switch when the key is turned to “Start.” The “I” terminal (Ignition) sends voltage to the ignition coil during cranking, ensuring continuous spark. Not all vehicles use both; some only require the “S” terminal connection. Knowing which your vehicle uses helps prevent wiring confusion and ensures proper solenoid activation.
How to Test a Starter Solenoid with a Multimeter
Testing a solenoid with a multimeter helps determine whether it’s functioning properly. Set your meter to measure voltage and connect the black lead to a ground point. Touch the red lead to the “S” terminal while turning the key to “Start.” You should see about 12 volts. If power reaches the solenoid but the motor doesn’t spin, the solenoid may be faulty. You can also check resistance between terminals to identify internal coil issues.
Troubleshooting Starter Solenoid Wiring Problems
If your engine won’t start, loose or corroded solenoid wiring is often to blame. Begin by inspecting each terminal for dirt, rust, or frayed wire ends. Ensure the large battery cable is tight and clean. Test each connection with a multimeter for voltage drops. If the solenoid clicks but doesn’t engage, there may be a weak ground or faulty ignition wire. Fixing bad connections usually restores normal starting operation quickly and safely.
Symptoms of Incorrect Starter Solenoid Wiring
When the solenoid wires are connected incorrectly, several warning signs may appear. The engine might fail to crank, produce clicking sounds, or even cause sparks at the terminals. In some cases, the starter may stay engaged after the engine starts, leading to serious damage. Dim lights or a sudden voltage drop can also indicate improper wiring. Always double-check each connection against a reliable wiring diagram before attempting to start the vehicle.
Common Mistakes When Hooking Up Starter Wires
One of the most common mistakes when connecting starter wires is mixing up the ignition and battery terminals. This can cause the solenoid to click but not engage the starter motor. Another frequent issue is failing to clean corrosion from the wire ends or terminals before attaching them. Loose connections may also cause intermittent starting. Always follow your wiring diagram closely, tighten all eyelets securely, and verify each connection before powering the system.
How to Replace Damaged Starter Solenoid Wiring
If the wires on your starter solenoid are damaged or corroded, replacing them is essential for reliable performance. Start by disconnecting the battery and labeling each wire for easy reinstallation. Use the same gauge wire for replacements to handle proper current flow. Strip and crimp the ends securely with quality terminals, and protect connections using heat-shrink tubing. Once installed, test voltage across the solenoid to confirm everything works correctly before starting the engine.
What Happens If the Wires Are Connected Wrong
Incorrectly connected solenoid wires can lead to various problems, from no-start conditions to electrical damage. The starter motor may spin without engaging the engine, or nothing may happen at all. In some cases, reversed wiring can cause sparks or drain the battery continuously. Miswiring might also damage the ignition switch or fuse. Always cross-check wire colors and terminal markings, and never guess connections. Using a wiring diagram is the safest approach to prevent mistakes
Testing Voltage at the Starter Solenoid Terminals
To test voltage at the starter solenoid, use a digital multimeter. Connect the black probe to a ground point and the red probe to the solenoid’s main battery terminal. It should read around 12 volts at rest. When the ignition key is turned to “Start,” check the “S” terminal—this should also show 12 volts. If there’s no voltage, inspect the ignition switch or fuse. Proper testing confirms if the issue lies in wiring, power, or the solenoid itself.
How to Know Which Wire Goes Where on the Solenoid
Determining where each wire goes starts with understanding the solenoid’s layout. The large terminal usually connects directly to the battery, while the opposite large terminal connects to the starter motor. A small wire from the ignition switch connects to the “S” terminal, and an optional “I” terminal may feed the ignition coil. Refer to your wiring diagram to confirm each placement. Labeling wires before disconnection helps avoid confusion during reinstallation.
Using a Wiring Diagram to Verify Connections
A wiring diagram is your best tool for confirming the correct setup. It visually shows which wire connects to each solenoid terminal and the path of electrical current through the system. Before making changes, compare your actual wire colors and positions with the diagram. This can help identify missing or misplaced wires that might cause no-start issues. Keeping a printed or digital version of the diagram nearby can save time during troubleshooting and installation.
How to Trace Wires from the Battery to the Starter

Tracing wires ensures that current flows properly through the entire starting circuit. Begin at the positive battery terminal and follow the cable leading to the solenoid. From there, track the wire that connects to the starter motor and the smaller wires that go to the ignition switch. Look for any breaks, corrosion, or melted insulation. If any section looks damaged, repair or replace it immediately. Proper tracing guarantees full power reaches the starter every time.
The Role of the Ignition Switch in Starter Operation
The ignition switch acts as the main control hub for the starter solenoid. When you turn the key to the “Start” position, it sends a low-current signal through the ignition wire to the solenoid’s “S” terminal. This activates the internal electromagnet, connecting the battery and starter motor circuits. If the ignition switch fails, the solenoid won’t receive a signal, and the engine won’t crank. Testing this connection helps confirm whether the issue lies in the switch or wiring.
How the Starter Solenoid Engages the Starter Motor
When the ignition key is turned, electrical current flows into the solenoid coil, creating a magnetic field. This magnetic force pulls a plunger inside the solenoid, bridging the large terminals together. As a result, full battery power transfers to the starter motor, spinning the engine’s flywheel. Once the key is released, the magnetic field collapses, disconnecting the circuit. This engagement process is crucial for a smooth, reliable engine to start every time.
Understanding Power Flow Through the Solenoid
Power flow through the solenoid begins at the battery terminal, passes through the coil when the ignition signal arrives, and then transfers to the starter motor. The solenoid acts as a relay, allowing a small ignition current to control a much larger current needed to turn the engine. If the solenoid fails or a connection weakens, power may not reach the starter. Monitoring this flow helps diagnose starting problems quickly and effectively.
Safety Tips Before Working on Starter Wiring
Before handling any starter wiring, always disconnect the negative battery cable to prevent electrical shocks or accidental short circuits. Avoid working near flammable materials since sparks can occur when connecting wires. Use insulated tools whenever possible and wear gloves for protection. If the vehicle has been running, allow the engine to cool down before working around the starter. Double-check that the car is in “Park” or “Neutral” to prevent unexpected movement while testing or reconnecting wires.
Tools Needed to Connect Starter Solenoid Wires
To connect or replace solenoid wires, gather the right tools before starting. Essential tools include a wrench set, socket set, wire stripper, crimping tool, electrical tape, and a digital multimeter. Heat-shrink tubing can help protect new connections from moisture and corrosion. A small wire brush is also useful for cleaning terminals before installation. Having these tools on hand ensures that your wiring job is clean, secure, and safe from electrical issues later on.
How to Tighten Eyelet Connectors Properly
Eyelet connectors must be securely fastened to ensure a stable electrical connection. Place the eyelet over the correct solenoid stud, and tighten the nut firmly with a wrench, but avoid overtightening as it can strip the threads or crack the connector. Always ensure that the connector sits flush on the terminal without corrosion underneath. A small dab of dielectric grease can help prevent rust and moisture buildup. Proper tightening guarantees solid voltage flow and reliable starter performance.
Signs of a Bad Starter Solenoid Connection
If you turn the key and hear a click but the engine doesn’t start, the solenoid connection may be bad. Other signs include intermittent cranking, dim lights when starting, or visible corrosion around the terminals. Sometimes, the starter motor may spin slowly due to poor voltage transfer through loose or dirty connections. Inspect all eyelets and wires for fraying or burns. Cleaning and re-tightening the connections often resolve these symptoms quickly and restore normal operation
How to Clean Corroded Solenoid Terminals
Corroded solenoid terminals can interrupt current flow and prevent your car from starting. Begin by disconnecting the battery, then remove the affected wires. Use a wire brush or sandpaper to clean off corrosion until the metal surface shines. Apply a small amount of baking soda solution if corrosion is heavy, then rinse and dry thoroughly. Once cleaned, reconnect the wires and coat the terminals with dielectric grease to prevent future corrosion buildup and ensure consistent power delivery.
Diagnosing a No-Start Condition After Rewiring
If your vehicle doesn’t start after rewiring the solenoid, recheck every connection carefully. Ensure that the battery cable is attached to the correct terminal and that the ignition wire is on the “S” post. Test for voltage at each terminal while turning the key to confirm current flow. Look for loose connectors or damaged insulation that could be interrupting power. If everything checks out but the engine still won’t crank, the solenoid itself might need replacement.
Grounding the Starter Solenoid Correctly
Proper grounding is essential for the solenoid to function. Many solenoids ground through their mounting bolts, while others have a separate ground wire that must be connected to the vehicle’s chassis. Make sure the mounting surface is clean and free of paint or rust to allow full contact. A weak ground connection can prevent the solenoid from engaging or cause slow cranking. Tightening and cleaning the ground connection ensures smooth and efficient starter operation.
When to Replace the Starter Solenoid
If you’ve verified all wiring connections and the starter still fails to operate, it might be time to replace the solenoid. Symptoms include repeated clicking with no engine crank, erratic starts, or a burnt smell near the solenoid housing. Replacement is relatively straightforward—disconnect the battery, remove old wires, unbolt the solenoid, and install the new one. Always match the replacement part to your vehicle model for compatibility. A new solenoid restores reliable engine starts.
How to Check Continuity in Starter Wires
Checking wire continuity helps identify internal breaks that aren’t visible. Set your multimeter to the continuity setting and place one probe at each end of the wire. If the meter beeps or shows near-zero resistance, the wire is good. A high reading or no response indicates a break in the wire. Replace any faulty wires immediately to prevent power loss during startup. Continuity testing is a quick way to verify the integrity of your starter circuit wiring.
Comparing Old vs. New Solenoid Wiring Layouts
Older vehicles often used external solenoids mounted on the fender, while most modern cars have solenoids built directly into the starter motor. The wiring layouts differ slightly—older systems may have more visible connections, while newer ones are more compact. However, the basic principle remains the same: transferring current from the battery to the starter when the ignition is activated. Understanding both layouts helps you work confidently on various vehicle types without confusion.
How to Mount the Starter Solenoid Securely
Mounting the solenoid securely is crucial for both performance and safety. The solenoid must be firmly attached to a flat, clean metal surface to maintain a solid electrical ground. Use the correct bolts and lock washers to prevent loosening from vibration. Avoid over-tightening, which could crack the housing or strip the threads. Once installed, ensure the wiring is neatly routed and not rubbing against moving parts. A secure mount ensures reliable operation and prevents unwanted electrical issues.
Can You Bypass a Starter Solenoid Temporarily?
Bypassing a starter solenoid can be used as a temporary troubleshooting step, but it should never replace a proper fix. To do this safely, use a heavy-gauge jumper wire to connect the solenoid’s battery and starter terminals briefly. If the engine cranks, the solenoid is likely faulty. However, exercise caution—this bypass sends full battery power directly to the starter motor. Always use insulated tools and disconnect the jumper immediately after testing to avoid sparks or damage.
The Importance of Using Proper Gauge Wires
Wire thickness, or gauge, plays a vital role in starter performance. The starter draws high current, so the main battery and motor wires must be thick enough to handle the load without overheating. Using undersized wires can lead to voltage drops, slow cranking, or even melted insulation. Always use the same gauge wire as the original factory setup—typically 4 or 6 gauge for main cables. Proper gauge ensures efficient power delivery and prevents electrical failures.
How to Secure Wires to Prevent Breakage
Loose or unsupported wires can vibrate and eventually break, causing intermittent starting problems. Use wire clamps or zip ties to secure the wiring harness along stable parts of the engine bay. Leave enough slack for movement but avoid tight bends or stretching. Protect exposed sections with plastic conduit or loom tubing to reduce wear. Ensuring your wires are neatly routed and supported helps maintain long-term durability and reduces the risk of electrical shorts.
Wiring Diagram for Typical 12-Volt Starter System
A 12-volt starter system typically consists of a battery, ignition switch, starter solenoid, and starter motor. The large positive cable runs from the battery to the solenoid, while another large wire goes from the solenoid to the starter motor. The small wire from the ignition switch connects to the solenoid’s “S” terminal to trigger engagement. Ground connections complete the circuit. Following this simple diagram ensures your wiring is correct and your starter receives consistent power.
Troubleshooting Starter Clicks but Won’t Turn Over
If you hear a clicking sound but the engine doesn’t turn over, it often points to a weak battery, corroded terminals, or a bad solenoid connection. Start by testing the battery voltage—it should read at least 12.4 volts. Clean and tighten all cable connections. If the voltage is good but the starter still clicks, the solenoid’s internal contacts might be worn out. Replacing the solenoid or cleaning the connections usually resolves this issue quickly.
How to Avoid Short Circuits During Installation
Short circuits can occur when exposed wires or tools touch grounded metal parts during installation. To prevent this, always disconnect the battery before working on the starter system. Inspect all wires for damaged insulation, and wrap exposed sections with electrical tape. Keep metal tools away from live terminals while connecting wires. After installation, double-check that all nuts and bolts are tight and that no bare wires touch other components. Safety should always come first.
Expert Tips for Correct Starter Solenoid Hookup
Experts recommend labeling each wire before removal to make reconnection easier. Always start with clean, corrosion-free terminals, and tighten each connection firmly. Use dielectric grease to protect against moisture and oxidation. Keep wires organized to prevent tangling or rubbing against hot engine parts. Lastly, refer to your vehicle’s service manual for model-specific instructions. Taking these small steps ensures long-lasting performance and prevents future starting issues.
Conclusion
Before finishing your wiring job, review a quick checklist. Ensure the battery is fully charged and all connections are tight and corrosion-free. Verify that the large cables are on the correct terminals, and the small ignition wire is on the “S” terminal. Confirm that all ground points are secure. Once satisfied, reconnect the battery and test-start the engine. If it cranks smoothly, your solenoid wiring is correctly installed and functioning properly.
FAQs
How many wires are typically connected to a starter solenoid?
Most starter solenoids have between three and five wires, depending on the vehicle model. These usually include two large cables (one from the battery and one to the starter motor) and smaller wires from the ignition switch or ground. Checking your wiring diagram helps you identify the exact number for your setup.
What happens if the starter solenoid wires are connected incorrectly?
If the wires are connected to the wrong terminals, the engine may fail to crank or produce only clicking sounds. In some cases, incorrect wiring can cause sparks, blown fuses, or battery drain. Always follow a proper wiring diagram before connecting any wire to the solenoid.
Which wire goes to the “S” terminal on the starter solenoid?
The small wire from the ignition switch connects to the “S” (Start) terminal. This wire sends the signal to activate the solenoid when you turn the key. Without this connection, the solenoid will not engage, and the engine won’t start.
What is the purpose of the large eyelet wires on the solenoid?
The large eyelet wires handle high current flow. One connects directly to the positive battery terminal, and the other leads to the starter motor. These wires must be clean, corrosion-free, and tightly secured to ensure proper power transfer when starting the engine.
How can I test if my starter solenoid is getting power?
Use a multimeter to test for voltage. Connect the black probe to a ground point and the red probe to the solenoid’s main battery terminal. It should read about 12 volts. Then test the “S” terminal while turning the ignition key—if there’s no voltage, check the ignition switch or wiring.
Why does my starter click but not turn over?
A clicking sound usually means the solenoid is trying to engage but isn’t getting enough current. This could be due to a weak battery, corroded terminals, or a faulty solenoid. Cleaning the connections and checking the battery’s charge level often fixes this issue.
Can I bypass the solenoid to test the starter motor?
Yes, but only for testing. You can briefly connect the solenoid’s battery and starter terminals with a heavy-gauge wire or screwdriver handle. If the motor spins, the solenoid is likely faulty. However, always use caution—this sends full power directly to the starter.
What gauge wire should I use for the starter solenoid?
For the main battery and starter connections, use 4- or 6-gauge wire depending on your vehicle’s electrical system. The smaller ignition wires can typically use 14- or 16-gauge wire. Using the correct gauge prevents overheating and ensures strong current flow during startup.
What does the thin black wire on the solenoid do?
The thin black wire is usually a ground or auxiliary wire that completes the circuit for the solenoid. If it’s broken or disconnected, the solenoid might not engage properly. Always repair or replace damaged ground wires to maintain a solid electrical connection.
How do I know if my solenoid or starter motor is bad?
If you turn the key and hear nothing, test for power at the solenoid terminals. If voltage reaches the solenoid but the motor doesn’t spin, the solenoid may be faulty. If no voltage reaches the solenoid, check the ignition switch or wiring. Testing both components helps pinpoint the issue accurately.
Keep an eye for more latest news & updates on premiumtechy!