When setting up an LED light bar, one of the most overlooked but critical factors is the wire gauge. Choosing the right wire size isn’t just about powering your lights—it’s about safety, performance, and reliability. Using the wrong gauge can lead to dim lights, blown fuses, or even melted insulation. In this guide, we’ll break down everything you need to know—from voltage drop to amperage—to help you pick the right wire gauge for your setup.
The correct wire gauge for an LED light bar depends on its amperage and the distance of the wiring. Most 12V light bars work safely with 12–14 AWG for short runs, while larger or high-power bars may require 10 AWG to prevent voltage drop and overheating. Choosing the right gauge ensures proper brightness, safety, and long-term performance.
In this article, we discuss the topic of “what gauge wire for led light bar”.
Understanding Wire Gauge

Wire gauge refers to the thickness or diameter of the wire, commonly measured using the American Wire Gauge (AWG) system. In AWG, a smaller number means a thicker wire. For example, a 10-gauge wire is thicker than a 16-gauge wire. Thicker wires allow more current to flow with less resistance, which is essential for high-powered LED light bars. Understanding wire gauge ensures you get the right balance between flexibility, power handling, and cost-efficiency.
Why Wire Gauge Matters for LED Light Bars
The wire gauge you choose determines how efficiently power reaches your LED light bar. Undersized wires cause voltage drops, reducing brightness and lifespan. They can also overheat, risking damage or fire. The right gauge ensures consistent voltage and optimal current flow, maintaining your LEDs’ full potential. Always remember—wiring is the backbone of your lighting system; even premium LED bars can fail with poor wiring.
How Wire Gauge Affects Voltage Drop
Voltage drop occurs naturally as current travels through the wire. The thinner the wire and the longer the distance, the more voltage you lose. In LED light bars, even a small drop can reduce light output significantly. A proper wire gauge minimizes voltage loss, especially in long cable runs. You can use online voltage drop calculators or charts to determine how much current your LEDs need and what wire size keeps losses under 3%.
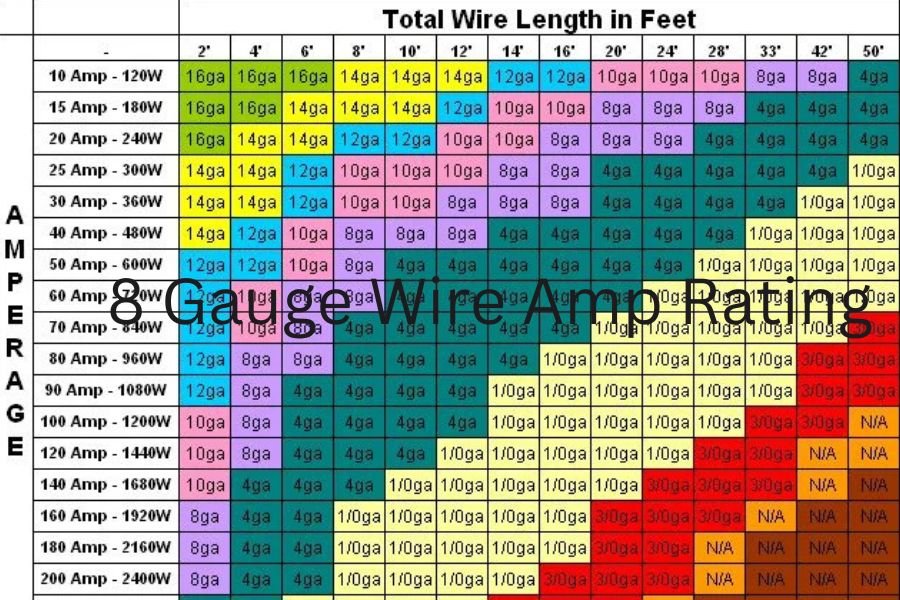
Common Wire Gauges Used for LED Light Bars
For most LED light bars, wire gauges between 10 AWG and 16 AWG are common. A 10 AWG wire is typically used for large, high-powered bars, while 14–16 AWG works for smaller or lower-current applications. The choice depends on amperage, voltage, and distance. Always check the manufacturer’s specifications or use an online AWG chart to ensure you match the correct wire size to your setup.
What Gauge Wire for a 12V LED Light Bar
Most 12V LED light bars draw between 5 and 20 amps, depending on length and wattage. For short runs (under 10 feet), 14 AWG wire is sufficient for bars under 10 amps. For longer runs or higher current draws, use 12 or 10 AWG to prevent voltage loss. Always err on the side of thicker wire for efficiency and safety, especially if running the wire from the vehicle battery to the light bar through a switch or relay.
What Gauge Wire for a 24V LED Light Bar
In 24V systems, current draw is lower for the same power level, so you can use slightly thinner wires than 12V systems. Typically, 16 AWG is fine for low-power 24V LED bars up to 10 feet, while 14 AWG or 12 AWG works for longer runs or high-wattage setups. The higher voltage means less current and reduced voltage drop, but maintaining proper gauge still ensures maximum performance.
Choosing Wire Gauge Based on Amperage
Wire gauge directly relates to how much current (amps) it can handle safely. For example, 16 AWG supports up to 10 amps, 14 AWG handles up to 15 amps, and 12 AWG can carry 20 amps comfortably. Always calculate your LED light bar’s total current draw and select a wire that exceeds it by 20% for safety. This ensures your wire won’t overheat, even during extended use.
How to Calculate the Correct Wire Gauge
To determine the correct wire gauge, use the formula:
Amps = Watts / Volts
Once you know the amperage, check an AWG current capacity chart. Also, factor in the wire length, as longer wires increase resistance and voltage drop. Tools like online “voltage drop calculators” can help refine your choice. Always round down to a thicker gauge if your calculation lands between sizes.
Distance and Wire Gauge Relationship
Distance is one of the biggest factors affecting wire size. The longer the wire, the more resistance it adds. For example, a 16 AWG wire might work for 10 feet but not for 25 feet. As a rule of thumb, go one size thicker for every 10–15 feet of added distance. This helps maintain voltage and prevents power loss, especially in off-road vehicles or boats with long cable runs.
Best Wire Gauge for a 50-Inch LED Light Bar
A 50-inch LED light bar can draw significant current—anywhere from 15 to 30 amps depending on wattage. For such large bars, 10 AWG wire is highly recommended to prevent voltage drop and overheating. Use relays and fuses rated for at least 125% of your current draw for additional safety.
Best Wire Gauge for a 30-Inch LED Light Bar
A 30-inch LED light bar typically draws 10–15 amps. For runs under 15 feet, 12 AWG wire is ideal. It balances flexibility and current capacity without unnecessary bulk. If your bar is mounted farther from the power source, consider upgrading to 10 AWG to maintain optimal voltage.
What Gauge Wire for Small LED Light Bars
Smaller LED light bars or pods (under 100W total) usually draw less than 10 amps. In these cases, 14 or 16 AWG wire works perfectly. These thinner wires are easier to route and cost-effective while still providing enough current capacity for smaller lighting setups.
Heavy-Duty LED Light Bars and Wire Gauge
For powerful, multi-row, or dual-beam light bars, current demand increases substantially. Use 10 AWG or even 8 AWG wires for setups drawing over 25 amps. Heavier gauge ensures minimal voltage drop, improved light output, and long-term reliability, especially in rugged environments or professional off-road use.
How to Read an AWG Chart
An AWG chart lists wire sizes and their corresponding amp capacities. Simply find your required current and wire length to determine the proper gauge. For instance, a 15-amp, 10-foot run would typically require 14 AWG. Always consult updated AWG charts from reputable electrical resources to make accurate decisions.
Copper vs. Aluminum Wires
While aluminum wire is cheaper and lighter, it has higher resistance than copper. This makes copper the preferred choice for LED light bars due to its superior conductivity, flexibility, and durability. Copper wires handle higher currents without overheating, making them ideal for automotive and marine environments.
Tinned Copper Wires for Off-Road Lighting
For vehicles exposed to moisture, mud, or saltwater, tinned copper wire is best. It resists corrosion and oxidation far better than plain copper. Tinned wires maintain conductivity over time and are perfect for off-road or marine LED installations where reliability is crucial.
What Happens if the Wire Is Too Small
Using a wire that’s too small can cause serious issues: excessive voltage drop, dim lighting, and even melting insulation. Undersized wires force more current through narrow paths, generating heat. This can lead to shorts, fuse blowing, or worse—electrical fires. Always size up your wire if in doubt.
What Happens if the Wire Is Too Large
While oversized wire isn’t dangerous, it can be impractical and costly. Thicker wires are harder to route and connect, especially in tight engine bays. They also require larger connectors. However, the benefits of reduced voltage drop and added safety often outweigh these drawbacks, especially for heavy-duty setups.
Safety Concerns When Choosing Wire Gauge
Choosing the right wire gauge is about more than performance—it’s about safety. Using an underrated wire can cause fires, while an over-fused system can fail to protect your circuit. Always follow manufacturer ratings, use proper fuses and relays, and ensure connections are tight and insulated.
How to Measure Current Draw of LED Light Bars
Before choosing your wire, it’s vital to know how much current (amps) your LED light bar actually draws. You can measure this using a multimeter connected in series with the light bar circuit. Alternatively, use the formula:
Amps = Watts ÷ Volts
For example, a 120W LED bar on a 12V system draws 10 amps. This simple step ensures you select the correct wire gauge, fuse, and relay for your installation—avoiding overload or insufficient power delivery.
Wire Gauge and Fuse Size Selection
The fuse size should always match the wire’s amp rating, not just the light bar’s current draw. For instance, if you’re using 14 AWG wire rated for 15 amps, the fuse should also be 15A or slightly below. Oversized fuses won’t protect the wire from overheating in case of a short circuit. Choosing the right combination of wire gauge and fuse ensures your wiring stays protected and your LED system runs smoothly.
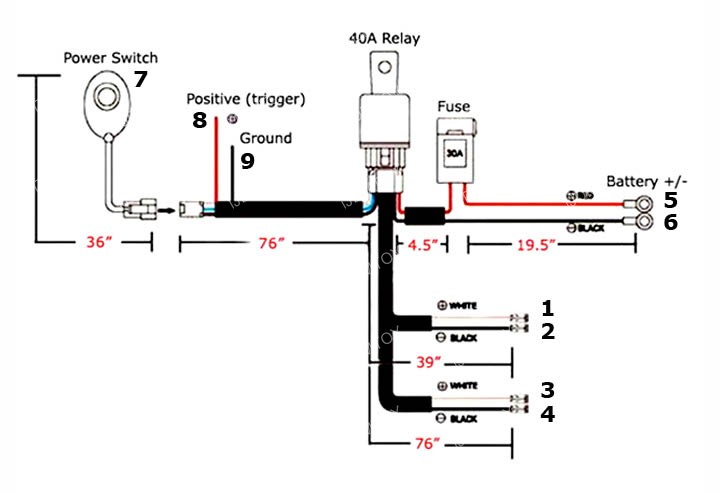
Using Relays with LED Light Bars
Relays act as a switch that allows your LED light bar to draw power directly from the battery while being controlled by a small dashboard switch. This reduces strain on the control switch and ensures full voltage reaches the light bar. For LED light bars drawing more than 10 amps, a 30A or 40A relay is typically recommended. Always wire your relay using an appropriate gauge—10 or 12 AWG for the main circuit—to maintain efficiency and safety.
Do You Need a Wiring Harness?
Yes—using a wiring harness is highly recommended for LED light bars. It simplifies installation and includes pre-sized wires, relays, fuses, and connectors designed for safe current handling. However, not all harnesses are created equal. Check the wire gauge before buying—some cheap harnesses use 18 AWG wires that can’t handle high currents safely. Always choose harnesses with 12 or 14 AWG wires for high-output LED bars.
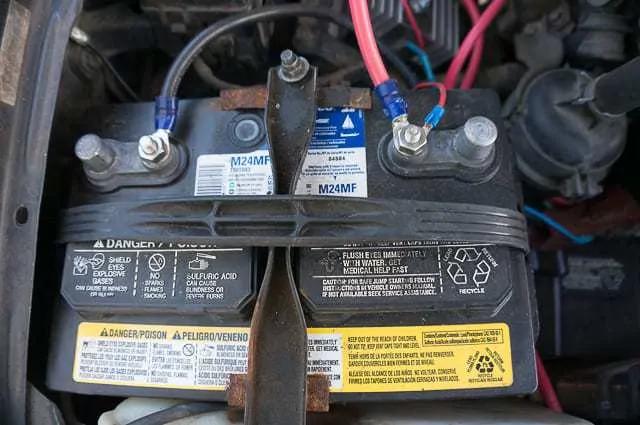
Direct Battery Connection vs. Switch Connection
For maximum performance, LED light bars should be connected directly to the battery through a relay and fuse. Connecting directly to a switch can overload it and reduce voltage. The direct battery route ensures a stable current supply, while the switch merely controls the relay—this setup minimizes voltage drop and enhances brightness.
Can You Use Speaker Wire for LED Light Bars?
Technically, you can, but it’s not recommended. Speaker wire isn’t designed for automotive environments and often lacks proper insulation for heat, oil, or moisture. It may work temporarily for small LEDs, but for long-term use, choose proper automotive-grade copper wire—preferably with PVC or silicone insulation—to ensure safety and durability.
Marine-Grade Wire for LED Installations
If your LED light bar is installed on a boat, UTV, or near water exposure, marine-grade wire is a must. These wires use tinned copper and high-quality insulation to resist corrosion and UV damage. Marine-grade wires maintain conductivity even in harsh saltwater environments, ensuring your light bar operates flawlessly for years.
Weatherproofing Your LED Wiring
Moisture is a silent killer of electrical systems. Always use heat-shrink tubing, dielectric grease, and sealed connectors to protect your wiring from water ingress. Weatherproofing not only extends wire life but also prevents corrosion and voltage loss that could dim your LEDs or cause shorts.
Heat Resistance in Automotive Wiring
Automotive environments expose wires to high heat from engines, exhausts, and sunlight. Always choose heat-resistant insulation materials like silicone or cross-linked polyethylene (XLPE). Regular PVC may soften or melt under extreme temperatures. Investing in high-temperature-rated wire ensures your LED wiring remains safe and intact.
Importance of Proper Crimping and Connectors
A perfect wiring setup can fail due to poor connections. Always use high-quality crimp connectors and heat-shrink terminals for a solid mechanical and electrical bond. Loose or corroded connectors cause resistance, leading to dimming or flickering lights. Good connections ensure consistent voltage and prevent future troubleshooting headaches.
Wire Gauge and Power Loss Explained
Power loss happens when current encounters resistance in undersized wires. This lost energy converts into heat, reducing efficiency. For LED light bars, even a 0.5V drop can affect brightness. Using thicker wires minimizes resistance and ensures the LEDs receive full power—bright, consistent light output every time.
Voltage Drop Formula for LED Light Bars
The voltage drop across a wire can be calculated using:
Voltage Drop = Current (A) × Resistance (Ω)
Resistance increases with length and smaller wire sizes. Use voltage drop calculators or AWG charts to determine ideal wire sizes, ensuring less than 3% loss for best performance. Keeping voltage drop low is crucial for consistent illumination and wire longevity
Example Calculation for Wire Size
Let’s say your LED bar draws 15 amps at 12V and the total wire length (both ways) is 20 feet. Using an online voltage drop calculator, a 12 AWG wire gives under 3% loss—perfect for your setup. However, a 14 AWG wire would exceed 4% loss, reducing brightness. This example shows why accurate calculation matters before cutting any wire.
Common Mistakes in LED Light Bar Wiring
Many DIY installers make common errors like using too-thin wires, skipping fuses, or running wires without relays. Others use electrical tape instead of heat shrink, leading to moisture entry. Avoiding these mistakes ensures your lighting system is safe, efficient, and long-lasting.
Wire Insulation Types (PVC, Silicone, Teflon)
Different insulation materials suit different environments. PVC is affordable but limited in heat resistance. Silicone offers flexibility and high-temperature tolerance, ideal for engine bays. Teflon (PTFE) is ultra-durable and chemical-resistant but more expensive. Choose insulation based on where you’re routing your LED light bar wires.
Recommended Wire Gauge for Dual LED Bars
If you’re running two LED bars from one power source, calculate the combined amperage draw and size your wire accordingly. For example, two bars drawing 10 amps each require wiring that handles at least 25 amps total—use 10 AWG wire for safety. Split the circuit using relays or fuses for each light to simplify maintenance and troubleshooting.
How to Extend Wire Length Safely
When extending your LED light bar’s wire, always match or exceed the original wire gauge. Use soldered joints or crimp connectors and protect them with heat-shrink tubing. Avoid twisting bare wires together—it’s unsafe and unreliable. Proper extensions ensure minimal voltage drop and prevent electrical issues later.
Using Wire Gauge Charts for Quick Reference
Wire gauge charts are your best friends. They list amp capacities, voltage drop limits, and recommended lengths. Print or save one on your phone to quickly determine the correct gauge when wiring in the field. A quick reference can save hours of guesswork and potential reinstallation.
How to Test Voltage at the Light Bar
Use a multimeter to check voltage at your light bar terminals. If you see more than a 0.5V difference from your battery reading, your wire is likely undersized or connections are poor. Testing ensures your LEDs get the power they deserve and helps identify weak spots in your wiring.
Upgrading Old Wiring for LED Systems
If you’re replacing halogen or HID lights with LEDs, inspect the old wiring. These systems may have used thinner wires not suited for modern high-output LED bars. Upgrading to 12 or 10 AWG copper wire ensures your new lights perform optimally and safely without stressing your old circuits.
Choosing Between Solid and Stranded Wire
For automotive use, stranded wire is preferred. It’s flexible, durable, and resistant to vibration—perfect for vehicles. Solid wire is stiff and can crack over time under movement. Always opt for stranded copper or tinned copper when wiring your LED light bar to ensure longevity and flexibility.
Best Practices for Off-Road LED Wiring
Off-road setups face vibration, mud, and water exposure. Use tinned copper wire, heat-shrink connectors, and corrugated loom tubing to protect your wiring. Secure wires with zip ties and route them away from sharp edges or heat sources. Following these practices keeps your wiring safe, even in extreme conditions.
Do LED Light Bars Come with Correct Gauge Wires?
Most pre-wired LED light bars come with short sections of 14–16 AWG wire, suitable for low current or short runs. However, once you extend to the battery or relay, you’ll likely need thicker wire (12 or 10 AWG). Always check the supplied wire thickness and upgrade if your total run exceeds 10 feet or draws more than 15 amps.
Signs of Undersized Wire Problems
If your LED light bar flickers, dims, or the wires feel warm, these are warning signs of undersized wire. You may also notice blown fuses or a burning smell near connections. Immediately replace it with the correct gauge wire to prevent permanent damage or potential fire hazards.
Benefits of Oversized Wire
Using a slightly thicker wire (lower gauge number) offers peace of mind—less resistance, cooler operation, and better performance. It may cost a little more, but it ensures your LED system runs efficiently with minimal power loss. Oversized wire also future-proofs your setup for additional lights or accessories later.
What Gauge Wire for Dual Battery Setup
In dual battery systems, power transfer between batteries and accessories requires heavy-duty wiring. For LED light bars connected to such systems, 8 AWG or 6 AWG may be ideal for main lines, depending on current draw. Always fuse each connection properly and use high-quality connectors to avoid voltage imbalance.
How to Avoid Overheating in LED Wiring
Overheating usually results from thin wires, loose connections, or overloaded circuits. Use correct gauge wires, tight crimps, and proper fusing. Avoid bundling wires tightly near heat sources. Ensuring good airflow and secure routing helps maintain safe operating temperatures for your LED wiring.
Recommended Tools for Wiring LED Light Bars
Having the right tools makes all the difference. You’ll need:
- Wire strippers
- Crimping tool
- Heat gun
- Multimeter
- Electrical connectors
- Zip ties and wire loom
These tools ensure professional, reliable, and clean installations that look great and perform flawlessly.
Tips for Professional-Quality Wiring
To achieve a pro-level finish, measure twice, cut once. Use color-coded wires (red for positive, black for ground) for clarity. Label your circuits, avoid sharp bends, and secure everything neatly. Taking extra time for organization and protection ensures your LED wiring performs perfectly and looks professional.
Conclusion
Choosing the right wire gauge for your LED light bar ensures long-term performance, safety, and reliability. Whether you’re powering a small light pod or a 50-inch off-road bar, following the right calculations and best practices will save you from frustration and costly repairs. Always prioritize quality copper wire, proper insulation, and secure connections—because your lighting is only as strong as the wires powering it.
FAQs
1. What wire gauge is best for a 12V LED light bar?
Usually, 12–14 AWG is ideal for most 12V LED bars under 15 feet, depending on amperage.
2. Can I use household wire for my LED light bar?
No, household wire isn’t designed for automotive vibration or heat. Use automotive-grade stranded copper wire.
3. How do I prevent voltage drop in my LED light bar?
Use thicker wires, shorter runs, and clean, tight connections to minimize voltage loss.
4. Do LED light bars need relays?
Yes, especially for bars drawing more than 10 amps. Relays protect switches and ensure full voltage delivery.
5. What happens if I use the wrong wire gauge?
Too thin causes overheating and dim lights; too thick adds cost and complexity. Always match wire to current and distance.
6. How far can I run 14 AWG wire for an LED light bar?
For a 12V system drawing around 10 amps, you can safely run 14 AWG wire up to about 10–12 feet before voltage drop becomes noticeable. For longer runs, use 12 AWG or 10 AWG wire to maintain brightness.
7. Can I connect multiple LED light bars to one switch?
Yes, you can, but ensure the combined current draw doesn’t exceed the switch and relay ratings. Use a heavier gauge wire and properly rated fuse to handle the total amperage.
8. Is 16 AWG wire enough for an LED light bar?
It depends on the light bar’s current draw and distance. For small LED pods under 5 amps and short runs (under 6 feet), 16 AWG works fine. For anything more powerful or farther away, use thicker wire.
9. Should I ground my LED light bar directly to the battery?
Yes, grounding directly to the battery negative terminal or a clean chassis ground ensures better performance and reduces flickering or dimming issues caused by poor grounding points.
10. What’s the safest way to connect LED light bar wires?
Use soldered or crimped connections with heat-shrink tubing for insulation. Avoid electrical tape as it can loosen over time. Sealed connectors prevent moisture and corrosion, keeping your setup safe and long-lasting.
Keep an eye for more latest news & updates on premiumtechy!